Friday, July 3, 2015
Sunday, June 28, 2015
Ways to Stay Cool
Besides the obvious of staying hydrated and buying a fan or air conditioner, here's some tips to stay cool during the hot weather (And yes, I'm feeling the heat, too):
1: If you have difficulty keeping your home cool, cover your windows with camping emergency blankets, such as those made by Coleman (I've only tried this brand):

1: If you have difficulty keeping your home cool, cover your windows with camping emergency blankets, such as those made by Coleman (I've only tried this brand):
I used to live in an old house, and my bedroom was like a greenhouse in the summer. Then, after having limited success with normal blankets, my aunt had an idea to use emergency blankets, and it worked very well. In fact, sometimes my bedroom was even cold (But that's not a bad thing coming in from the hot outdoors).
It works like a one-way mirror or shiny sunglasses: You can see out, but light can hardly get in. And it's not blindingly bright on the outside, not like a mirror. It's more like looking at crinkled aluminum foil in the sun.
I put this in at number one on the list just so people will see it, even if they just glance at it and move onto the next blog. The rest of the things on this list are not in any particular order.
2: If you put a bottle of water, soda, Gatoraid/Poweraid, or anything you like in the freezer for about 30 minutes to an hour, depending on how much liquid is in the bottle, you can make your own slushy drink. When it's partially frozen, give it a hard shake, and the ice will turn to slush in the rest of the liquid. It's perfect if you're on-the-go, too. Just don't forget it in the freezer! (A timer or an alarm clock can help.)
3: Owning a soft fabric ice compress (or more) can help cool you off, but these also help: freezing a damp (Not wet, so wring it out) washcloth; filling a sandwich bag half-way with water (Or thick dish soap, such as Dawn, but I haven't tried that, yet) and double-bagging it so it doesn't leak; (To be continued)
4: If it's bad enough, try sleeping on the floor (Think: Hot air goes up, cold air goes down. If you sleep on the top in a bunker bed or upstairs, you may have trouble falling asleep or sleeping).
5: Take a cool or cold shower. (When I was five-years-old, we didn't have the money to own a swimming pool, so what my mom did was dress my brother and I up in raincoats and rain boots, and then turn on the cold shower. It was a blast, and we screamed and giggled the whole time. At one point, I remember having an umbrella in there, too.)
...To be continued
Tuesday, February 24, 2015
Bacon Maple Bar vs. Bacon Maple Bar
I heard from a family member up in Everett, WA, USA, about a couple of local shops that both sell fresh bacon maple bar doughnuts about seven blocks from each other, so I was curious as to which of them was better. Feeling adventurous and wanting to compare them first-hand and as in-depth as I could, I went to both shops, bought one doughnut each, and then later tried them at home.
Here's what I found:


Here's what I found:
Pictured: Left, Henry's Donuts. Right, Karl's Bakery & Cafe.
Having a personal love for bacon, I immediately determined that Karl's does not have enough bacon on it, but that it looks bigger and is completely hand-made.
Henry's just looks like a store-bought maple bar that someone just stuck on a bunch of bacon bits with a slight bit of extra icing.
Karl's is also noticeably heavier, as though made with more wholesome ingredients.
You can see how Karl's is slightly taller. Already my stomach was crying out for Karl's, but that my taste buds were aching for all that bacon on Henry's.
Another delicious view of the two competitors.
Cutting the two in halves for tasting purposes, I was surprised by how hard it was to cut Henry's, and by how it caved in and forced me to be careful not to flatten it. It was as though it were made hardly of anything. I imagined chewing it would be rather doughy. The Karl's was super easy to cut, especially since the outside was crispy, it didn't cave in like Play-dough, and since the bread part didn't stick to the knife.
Let the games begin!
*nom nom*
Detailed Results:
Winner on bacon: Surprise! Karl's won!
Reason: Henry's bacon was not only overpoweringly salty, but it also had a strong hint of a chemical flavor, as though it were an artificial bacon flavoring or smoked flavoring. That was awful. I truly did not expect that. I wanted to eat and taste bacon, but instead, I got bacon and fake bacon. Please, give me one or the other, folks. Putting in both good and bad only puts them in a wild boxing ring, not at all complimenting each other. *clash!*
Improvement suggestion for Karl's: Add just a little more salt, and add a lot more bacon, then I'll be dancing.
Winner on icing: Tie.
Reason: I honestly couldn't tell the difference between the two. The texture and the amount was about the same, and both competitors didn't have as much icing as I expected.
Improvement suggestion for Karl's: When you put on the bacon, I suggest using a stickier icing to sort of glue on the bacon (that, or press the bacon a little harder into the icing), because my first bite involved losing a mouth-watering chunk of bacon [and other little pieces] to the floor... and then my dog ate it. Also, I imagined more of a creamy texture to melt around those meaty chunks, so maybe have the icing be hardened on the outside and creamier on the inside (It would compliment the texture of the breading, which I'm going to get to in just a second). In addition, I kept waiting for more of a maple flavor to compliment the bacon, so I'd say: Either more icing or a tiny bit more maple extract should do the trick.
Winner on breading/dough: Karl's! Yay!
Reason: Not only was it the taste and texture that made the kill, but it was also how it changed during the chewing process. A lot of people don't realize the importance of having a doughnut with an excellent bread part to it (in fact, they couldn't care less about it), but they sure will consider it once they try this one! The taste was like a sweet, home-made bread baked by someone's neighborhood-famous grandma. ...Make that world-famous. The texture was phenomenal. It was crispy on the outside and soft on the inside. But it was not chewy or doughy. I could tell that much thought and effort was made into making the recipe just right. I liked it so much, I turned the doughnut upside-down and took a bite of just the breading. I determined that it was so delicious, I'd be willing to eat it even without icing or anything else on top or filled inside. The fun part was chewing it and not once finding it turning into a chewy, near-tasteless, pasty glop that gets stuck to my gums, teeth, or the roof of my mouth. I appreciated that very much.
Another thing about the different textures: Biting into the two doughnuts was also interesting, I might add. Similar to the case with cutting it with the knife, the Henry's went almost completely flat when I took each bite. There was hardly anything in there to begin with. It looked deceptively the same as the Karl's on the inside, but the compositions were hardly related enough to be cousins. I don't know what either were made of, but one thing's for sure: Traditional store-bought doughnuts are not real doughnuts. I'm not buying those again, not after what I've learned. I'll still eat them when someone offers one to me or if they're around and I'm "hungry", but I'm not throwing my dollars away to artificially-flavored air.
Needless-to-say final verdict: The Karl's Bakery & Cafe bacon maple bar totally wins this!
Oh, and comparing the prices:
Henry's Donuts bacon maple bar: $1.80
Karl's Bakery & Cafe bacon maple bar: $2.50
Even though Karl's is more, it's better worth buying. It's bigger, better, more filling, healthier (as far as doughnuts go), and... at the time - now, I don't really know if this was just a deal of the day or anything, but... I also got another doughnut (for my sister) for the price of one. So, buy one get one free? Not bad, Karl's! Not related to the bacon maple bar, I have to note that Karl's has a wider selection of bakery items, and they're a lot fancier, too. It was my first time in there, and now will definitely not be my last.
Thanks for reading!
http://www.karls-bakery.com/
http://www.yelp.com/biz/henrys-donuts-everett
P.S. I haven't tried anything else at either of the two places, so I'm not saying Henry's Donuts itself is bad, only their bacon maple bar. But, each to their own tastes. I have yet to compare many other things over time. Explore your own taste buds!
Wednesday, December 24, 2014
The Best Peanut Butter Cookies You'll Ever Have

What, you mean all other peanut butter cookies are terrible and dry? I guess I wouldn't know that, since I grew up making these with my mom and brother. But I had noticed that whenever I had store-bought or most other people's peanut butter cookies, they weren't as good, so maybe I did know but just didn't think I'd lived enough or something. But whatever; I don't really pay attention, I just eat anything sweet I can get my hands on.
Edit 12/18/17: I can eat peanuts again! 😃 After 8 years of no chocolate, peanuts, tree nuts, and other foods, I finally had a food allergy test last year to see if I was still allergic, and I'm not! My allergist said that, based on my reported reactions, I no doubt was allergic at one time, but she has had a lot of people grow out of their allergies and food sensitivities, so the same had happened to me. ...But I'm still lactose intolerant, so I have to take a lactase supplement every time I consume anything containing dairy, including these cookies. Oh well. At least I can eat them again! <3
Note: The original recipe comes from the Better Homes and Gardens: Cookies and Candies by the Meredith Corporation [All right reserved, of course], 1966. I have the eighth printing (1971).
Second Note: There , which ask for you to roll them into a tube shape and cut them later. I don't do that, and nor do I stick the dough in the fridge for an eternity when I can just so easily use the freezer, but I'll post it below my version anyway for those who'd like to try it out.
Third Note: There is no third note. Three just makes it look pretty.
[I'll be posting pictures of the steps the next time I make the cookies]
...Ohh, well lookie cookie here! You can get the cookbook for cheap on Amazon.com! http://www.amazon.com/s/ref=nb_sb_ss_c_0_37?url=search-alias%3Dstripbooks&field-keywords=better+homes+and+gardens+cookies+and+candies&sprefix=better+homes+and+gardens+cookies+and+%2Caps%2C203
It looks like this:

Anyway, back to the recipe:
On page 51, under the category, "Teen winners", it's called Double Peanut Butter Cookies.
My version, first (which I made wordier and more specific for the sake of preventing confusion or freak-outs [especially found among newbies and perfectionists or weird people like me):
*Edit on December 16th, 2016: I figured out and tested out a different way for flattening the dough. It's a lot easier with your gloved fingers than a glass cup. The glass cup method was frustrating and time-confuming because you had to get the bottom of the glass cup to keep the dough from sticking to it. I've modified this recipe with the better method. Note: The ingredients and measurements are still the same.
**Edit on December 18th, 2017 (Yes. Almost one year later, we finally tried it, but then I forgot twice to edit this blog post to remove the butter option because life's been busy lately with a family member's surgery coming up, as well as a bunch of other errands to run.): Do NOT use butter in place of shortening. It ends up tasting terrible and flat and it tastes more like butter than peanut butter. The combination is unpleasant. I mean, I ate it anyway, but it just lost it's magic. Nothing like the good recipe. I originally found a link that shows you how to replace shortening with butter, but I don't know if even that would be right. Best way to do this: If you really want to be healthier, find an organic non-soybean oil substitute to regular shortening.
Makes 2 dozen
Tools needed:
1 cup
1/2 cup
1/4 cup
1/2 teaspoon
1/4 teaspoon
1 Tablespoon
1 or 2 silicone spatulas (for peanut butter and for shortening)
Mixing bowl (preferably metal, but glass works well, too)
Mixing spoon
2 ungreased cookie sheets
1 pair of disposable gloves (non-powdered)
1 small spoon for scooping out dough
1 small spoon (or 1/2 teaspoon) for peanut butter jar (after dough is made)
1 metal fork
1 small glass or cup of water for fork (optional)
Measurements and ingredients:
1 1/2 cups sifted all-purpose flour
1/2 cup granulated sugar
1/2 teaspoon soda
1/4 teaspoon salt
1/2 cup shortening
1/2 cup creamy peanut butter
1/4 cup light corn syrup
1 tablespoon milk
Sift together dry ingredients.
Cut in shortening and peanut butter till mixture resembles coarse meal.
Blend in syrup and milk.
Thoroughly mix. (Even if it seems like it's too dry, do NOT add more liquid. Your mixing arm may get sore, but in the end you will thank yourself for being patient).
Stick the bowl in the freezer for at least 40 minutes (a metal bowl works faster, but glass is almost as fast) or until it's firm.
After at least 40 minutes has passed (though it doesn't hurt to leave it in there overnight), preheat oven at 350 degrees.
Put on the disposable gloves. This will keep your hands from getting greasy from the peanut butter and will help keep the dough from sticking to your skin (This especially happens when the dough thaws and because your skin is warm).
Using a small spoon, scoop out some dough and place into the palm of your hand.
Roll the dough around between your palms until it's a smooth ball, about the size of your palm (cherry or walnut-size range, if you like to imagine it that way like I do). Now, when the dough is cold just out of the freezer, it may clump and sort of crumble at first, but if it gives you much trouble, squeeze the crumbling parts together again between your fingers and add more pressure when rolling between your palms.
You will at least want an inch or so space between each ball you place on an ungreased cookie sheet. You can fit twelve on a single cookie sheet.
With your finger knuckles (Look at your palms, then close your fingers into fists. You'll be using the flat parts of your fingers between your center knuckles and tips-of-your-fingers knuckles.), flatten the cookies to about 1/4 inch thick. I like to turn my hand three times from left, to right, to left with the same pressure when I'm pressing on the dough. It makes all of them have the same thickness everytime. And don't worry too much about your finger indentations. The cookies expand quite a bit.
After all are flattened, scoop out peanut butter with half of a small spoon (or 1/2 teaspoon peanut butter) and plop it in the center of each cookie. The amount doesn't have to be perfect, because chances are you'll have cookies of different sizes. It doesn't hurt to have a little too much on a small cookie, either. If you like, you can also place one small chocolate chip in with the dab of peanut butter for a chocolate peanut butter cup taste.
On another cookie sheet, repeat the balling and flattening process EXCEPT for the dropping on peanut butter on top. Instead, carefully place these on top of the ones with peanut butter on them (like the top layer of bread on a sandwich). It's okay if they fall apart, rip, or twist shape as you pick them up and place them down on top.
With a wet fork, gently press down all around the cookies along the edges to create that sort of flowery effect. (Not only for decoration, but also to seal the edges and keep the peanut butter from oozing out.) You might have to dip the fork in a cup of water for every completed cookie to prevent the dough from sticking to the fork, depending on how thawed your dough is.
Once finished, bake at 350 degrees for 12 minutes.
Cool slightly after taking them out, then remove from the baking sheet. If they start breaking, wait a little longer before you remove them.
Warning: Don't be tempted to take a bite too soon after removing them from the oven. It doesn't matter how mouthwatering they look and smell. It kills me, too. The reason why is the peanut butter in the center will still be much hotter than the rest of the cookie, so wait a little while longer after the outside has cooled.
Enjoy!
The book version doesn't mention the materials needed, nor the alternative to shortening. It otherwise has the same measurements and ingredients as mine. The only real difference between my version and its own is that it's not as specific, that it involves shaping the dough into a 2-inch roll and cutting slices, and it asks to spread the peanut butter on the dough. I prefer the way I've always made it as a kid, but feel free to test out both methods and see which way you find easier.
Here's the book's version:
Sift together dry ingredients. Cut in shortening and peanut butter till mixture resembles coarse meal. Blend in syrup and milk. Shape into 2-inch roll; chill. Slice 1/8 to 1/4 inch thick. Place half the slices in ungreased cookie sheet; spread each with 1/2 teaspoon peanut butter. Cover with remaining slices; seal edges with fork. Bake at 350 degrees for about 12 minutes. Cool slightly; remove from sheet. Makes 2 dozen.
However you choose to make these, you'll love them more than any other peanut butter cookie.
 Photo: December 15th, 2016
Edit 12/18/17: I might take a picture of each step. Maybe when life isn't so busy I'll remember.

Edit 12/18/17: I might take a picture of each step. Maybe when life isn't so busy I'll remember.
Edit 12/18/17: So my mom finally recalled where the modified recipe somewhat came from: Her mom, my grandma, used to make them like this. But whether she came up with it herself or if she learned it from her own mother or elsewhere, we have no idea from there.
Saturday, December 13, 2014
My Idea to Solve the Plastic-in-the-Sea Problem
Whenever I see any article about the plastic in the ocean, I say the same basic thing: Make a dozen giant blenders, dump it all in the blenders and make a powdery smoothie.
Well that's not good.


Friday, December 12, 2014
Friday, October 31, 2014
Cool Dragon Pumpkin!
So, this year, I bought two pumpkins. I wasn't able to afford two last year, but since I have a job now I was able to get two (I could have bought more, but I didn't want to wear myself out). Since Christopher Paolini's twist on the Ice Bucket Challenge was so awesome (see http://youtu.be/XDS8Lqu8Me8 ), I decided to carve a scene from it (Of course, the fire scene). In addition, I didn't know what to make the second one, so I asked Christopher what the second pumpkin should be.
His reply: "Surprise me with a cool dragon."
So, I went to work:


His reply: "Surprise me with a cool dragon."
So, I went to work:
I'm not good at drawing things up from my imagination. That part is hard for some reason. That's why I sketch instead, using some kind of model to help me (A picture, a drawing, a person or myself). But, this time, I had nothing to work with. He gave me no picture with work with, so this became a fun challenge.
I did end up using a couple of dragon drawings by other artists just a little bit only to decide what shape of muzzle, eyes, and nostrils I didn't want, but my main source of inspiration was just making scary faces in the mirror.
But first, I tried to draw the eyes:
You can see from the left sticky note that I tried several times to get it right. The right sticky note I drew by flipping it over on the other side of the left one, making a near perfect copy of the left side. I always have difficulty making eyes the same shape, but I realize that most people's eyes are almost never exactly perfect (Try taking a mirror to half of your face in a picture).
Next, to make parts of the face, I made a flip copy on another sticky note.
I used the lines of my nose (as I wrinkled it and glared in the mirror) to make the lines of the dragon's.
Then, I copied it onto a regular sheet of paper, using pencil and pen after.
After several times to get the lips right, I finally realized that having closed lips wasn't cool enough. I wanted more teeth showing than just the fangs!
Rroarrrr!! Now it looks more like a dragon! The other one looked like a disgusted frog.
Getting the open mouth shape wasn't easy, either. I think the hardest part of drawing the dragon was definitely its mouth.
The drawing! Bonus: My coffee-black Siamese-mix cat, Sweetie, is in the background.
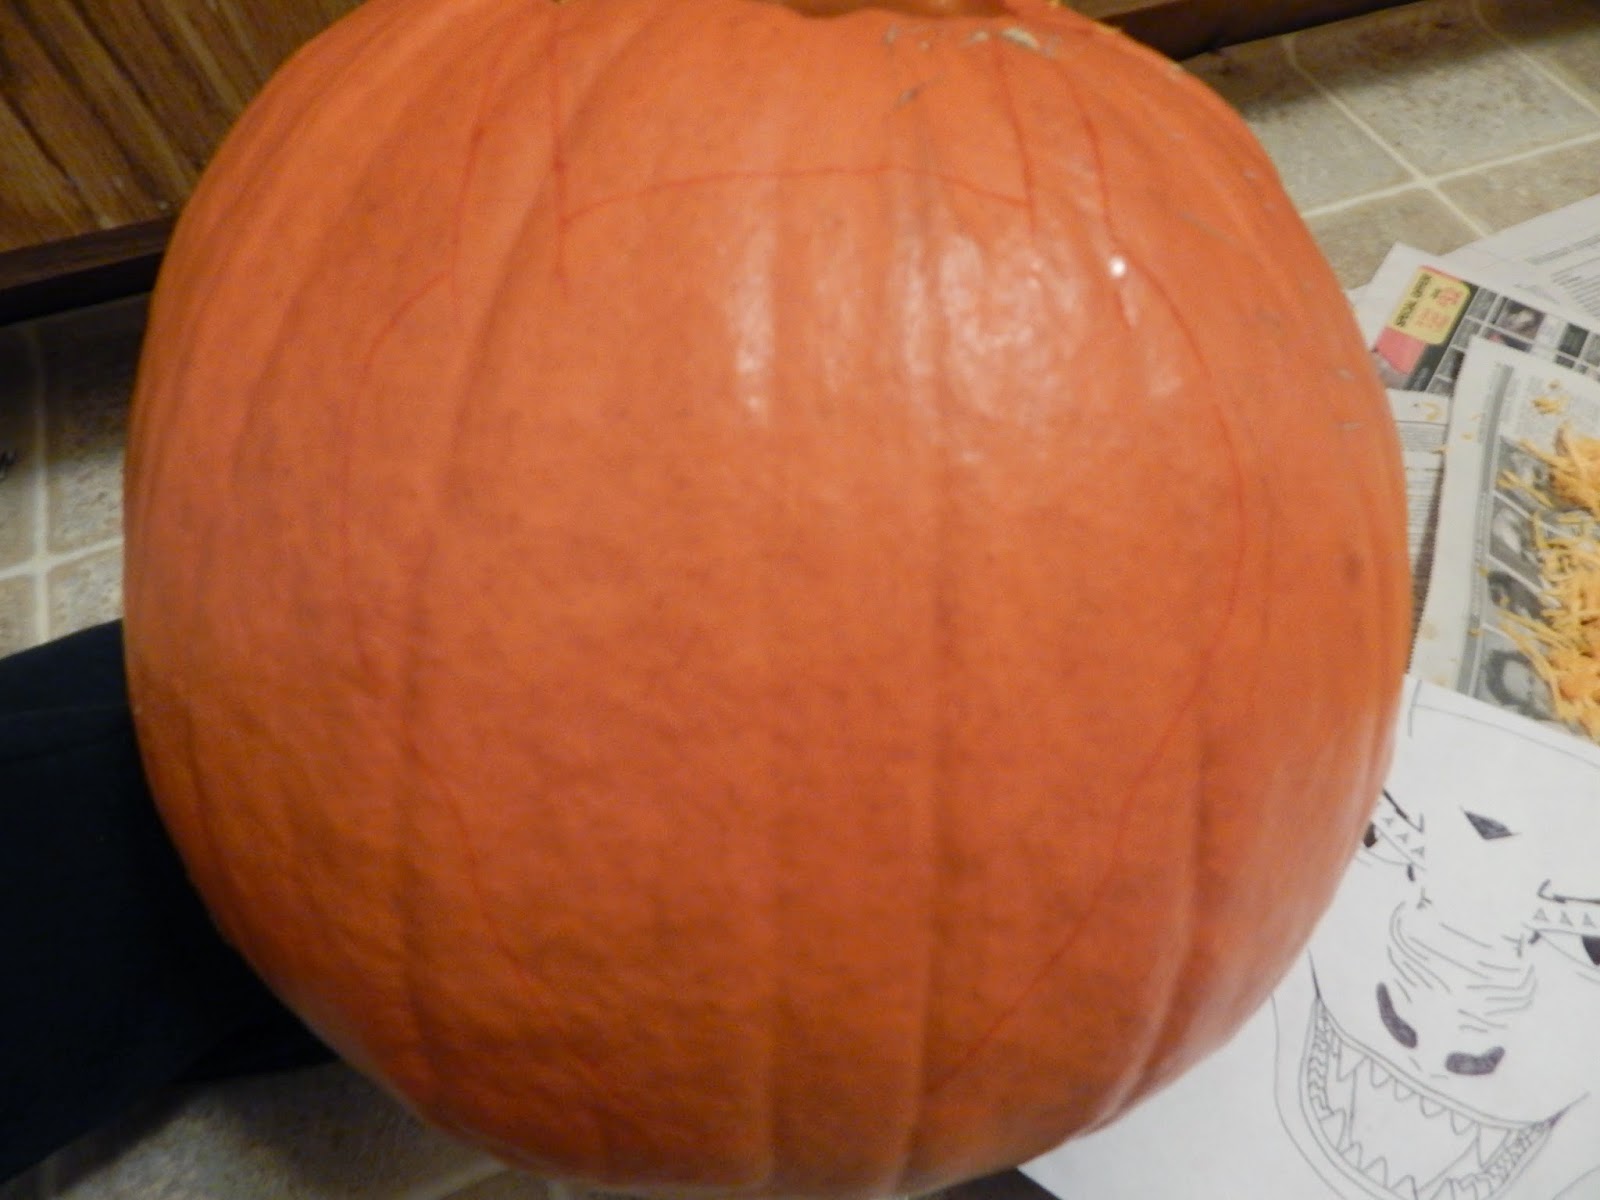
Next, the face outline! I was going to just sketch the drawing onto the pumpkin, but then I realized the drawing was the perfect size, so I placed the paper on the pumpkin, held it there nice and tight, and scratched my thumb nail over the lines. Thaaat left me sore. I should have made a copy of the drawing at the copy machine so I could tape it on there, but I forgot to that day I was at the library, and I didn't want to wait (A good thing, huh?).
I bought a cheap children's pumpkin carving kit mostly for the cowboy spur thingy. Last year, I poked a gazillion holes using a toothpick! This definitely saved a lot of time and prevented me from getting a cramped hand.
Ehh.... After digging my thumb nail into the lines, despair tore me down. The mouth was too close to the right and too close to the chin. It was also too detailed! The teeth I had to simplify during the carving process. Oh, and by the way, the molars were inspired by my own. When I was nine until age twelve, I ground my teeth together into sharp points. It wasn't a great idea, because to this day I still often bite my cheeks or my tongue and sometimes the inside of my lips, causing terrible damage. I have abnormally thick cheeks (according to two separate dentists), so I bit myself on accident even before I ground them into fine points. It's not fun drawing blood, mind you, so don't you start grinding your teeth just because it looks cool!
Ahem! Pardon. I got off-topic a little.
Yay! Red thumb and finger! Using the spur thingy, I still had to keep a firm hold on it to prevent mistakes. Still, it was much less pain than when I carved the first #paolinipumpkin, where I used a certain kitchen knife I don't have a name for made my middle finger swell. That was fun. Heheh But it was so worth it. Sometimes what gives you the most pain through effort gives you the most satisfaction in the long term.
Now for the nose picking! Making holes, that is.
Ha! Dragon boogers. Grossed out my mom. I couldn't stop laughing.
Completion! The right horn/ear is shaved off on the side because I was going to use this shaver-like pumpkin-carving tool, but then it took off waaaay more pumpkin skin than I expected.
Darn it! My mom got a new camera (after she took the old one to the beach and fell in the water with it [And, yes. We did put it in rice, but it still doesn't work]), but now this one is super good with night pictures! I'll have to take a pic in the pitch black for the candle light to work. (I'm actually using an electric candle since I'm displaying it in the library).
Judging between the two, I like the drawing better. But I guess pumpkins are much harder to get to look great.
The tools I used! Minus the evil shaving thing that destroyed the horn/ear. The metal spike is actually the thing you pierce through a turkey's legs in the oven. I found it was a perfect tool. I'm totally using it next year.
When Halloween is over, and I come back to the library on Monday, I'm taking it back home. There, on the porch, I'm going to let it rot (I have a concrete porch, so staining isn't a worry for me). It's quite hilarious watching the transformation (especially when it's a carving of a person, as you may well know). ;-D
Oh, and one more thing: The other pumpkin I'll be carving as soon as I can. This pumpkin took me longer than I expected, so I apologize for my tardiness. Tonight's my sister's Halloween party, so I'm booked all day. I'm just using what little time I have to blog this because it's Halloween and because you deserve this much for the wait.
Be safe this Halloween! Friday nights can be a bit crazy, and beware of ferrets drunks on the roads!
Subscribe to:
Comments (Atom)